


Retouching Series: Architectural Photography, Removing the Tree

Before & After
I shall start off the series with a tough one!
The first blog in the series! I go through tips and tricks of using Photoshop to remove a tree that was blocking a building.
As an interior photographer, retouching is something I do all the time. The process comes second nature to me. It doesn’t take me too long to retouch small little flaws. However, I might occasionally encounter some projects or photos that will require extensive retouching work. These projects leave me sitting in front of the computer for hours on end. Here is a little insight to a recent assignment that needed a substantial amount of retouch work, and steps I did to produce the final image.
I will be sharing the work behind a project for a client that required heavy retouching to an architectural exterior building shot. The steps and techniques I describe in this blog involves fairly advanced post processing skills. You may need to know your way around photoshop pretty well in order to really follow along.
The best way to deal with unsightly objects that you do not want in your image, is to handle and remove them on-site at the shoot. But there are times that this is just not possible. Right here, this is a particular angle that the client wanted. There was almost no way to get a clean shot from the ground with the dense trees surrounding the building. Thank goodness for the pedestrian walkway, I had a slight opening here that gave me a little space.
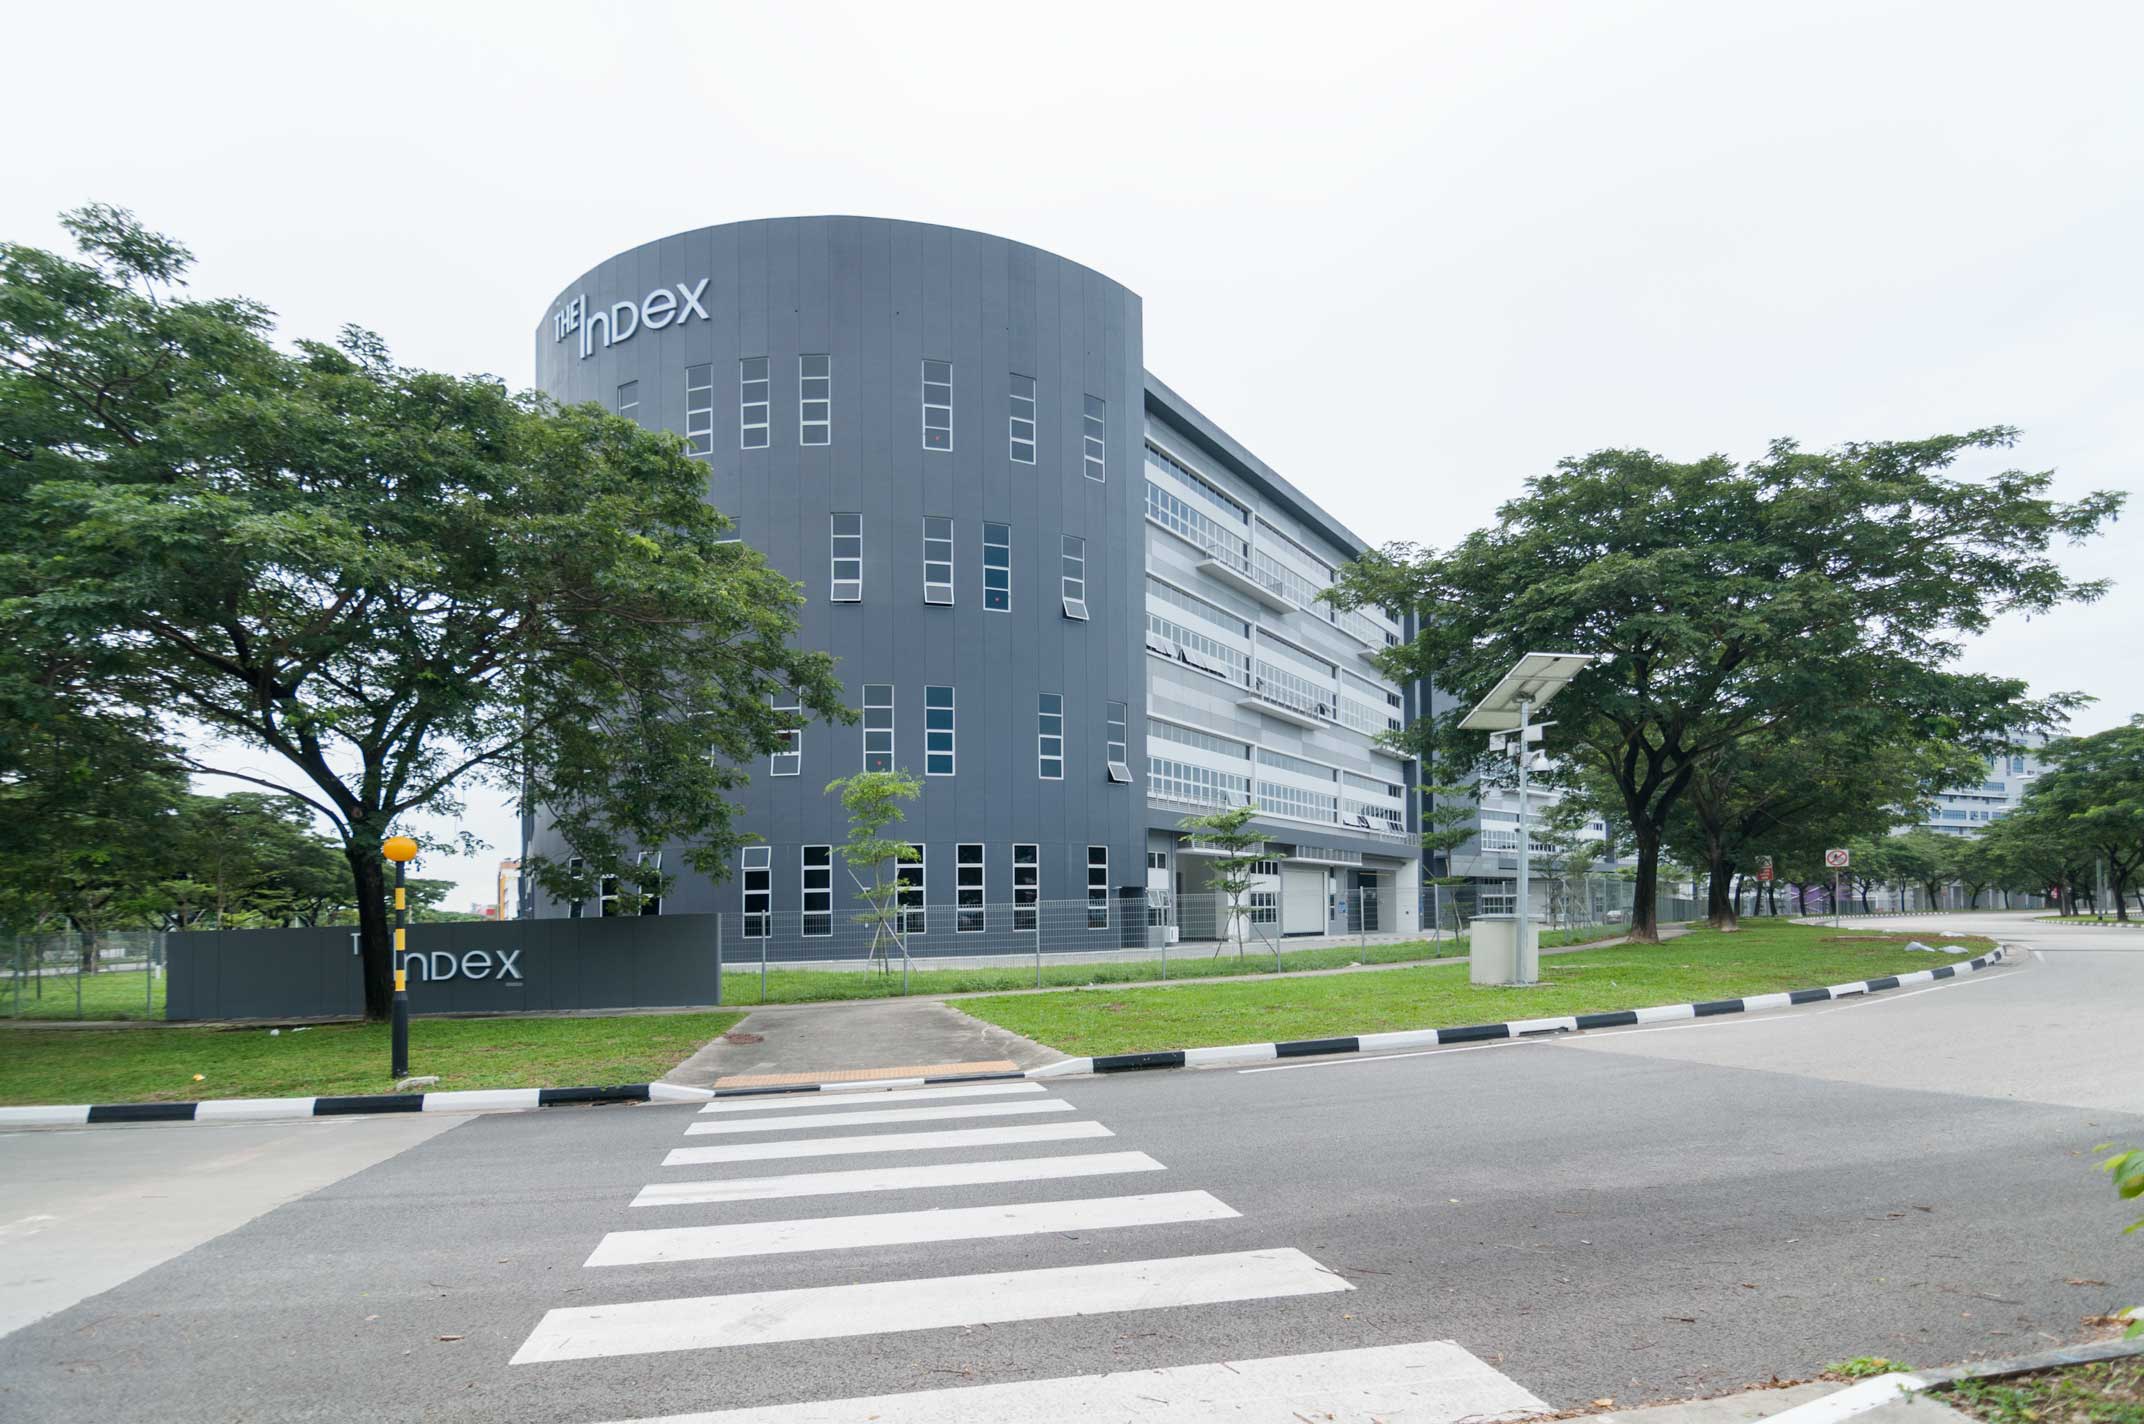
Initial image. Do note that this photo is not straight out of the camera, basic correction has already been applied to the photo.
Analyzing the image
The client really wanted this particular angle, and asked if I was able to remove the tree on the left of the frame that was blocking a huge portion of the building. One look and you could probably tell this is certainly no small feat. There are limitations to how much I can realistically retouch an image, and I always let my clients know that. But after studying this particular image briefly, I figured I had the confidence to actually remove that entire tree and “rebuild” that part of the building. Here were the challenges I foresaw, and signs that showed that there was enough hope for me to proceed:
- I am always concerned about losing texture when it comes to retouching. By working carefully with the clone stamp tool, I knew that there were good parts of the building enough for me to sample. Usually, you would sample a bigger area to repair a smaller area, but for this case it was the other way round. I would then be losing lighting, contrast, shadow and color detail. For those, I will have to recreate them with other techniques as described later.
- Missing windows could be added by sampling from the other available windows. In fact, there were a few good samples to choose from. Perspective and contrast of the windows could easily be corrected by skewing and applying contrast curves respectively.
- Carefully overexposed skies is this shot means it will be easier to do selection and masking for the sky replacement.
- Looking at the building ground sign that was blocked by the lamp post and tree trunk at this point, my initial thoughts were to use the clone stamp tool and the brush to fill in the missing parts of the logo. But later on when I got down to working on the photo, I decided instead that superimposing the logo from a sample I took from another image would be much easier.
I felt that despite the difficulty and tediousness, all the issues here could actually be fixed. So I poured myself a cup of coffee, sat in front of my computer, and began the task.
Begin by removing the tree
First step; the heavy work. Using the clone stamp tool at 100% softness, I carefully sampled the good areas to “rebuild” the building. You can see from the image below, the embossed lines running vertically in the exterior walls of the building, I made sure to keep them aligned as I was cloning. There is not much I can do to preserve luminosity detail at this point. What is more important now, is to retain as much texture as I can. Slowly work on the bigger areas first, then work your way to refine it.

This is how the process will look like midway.

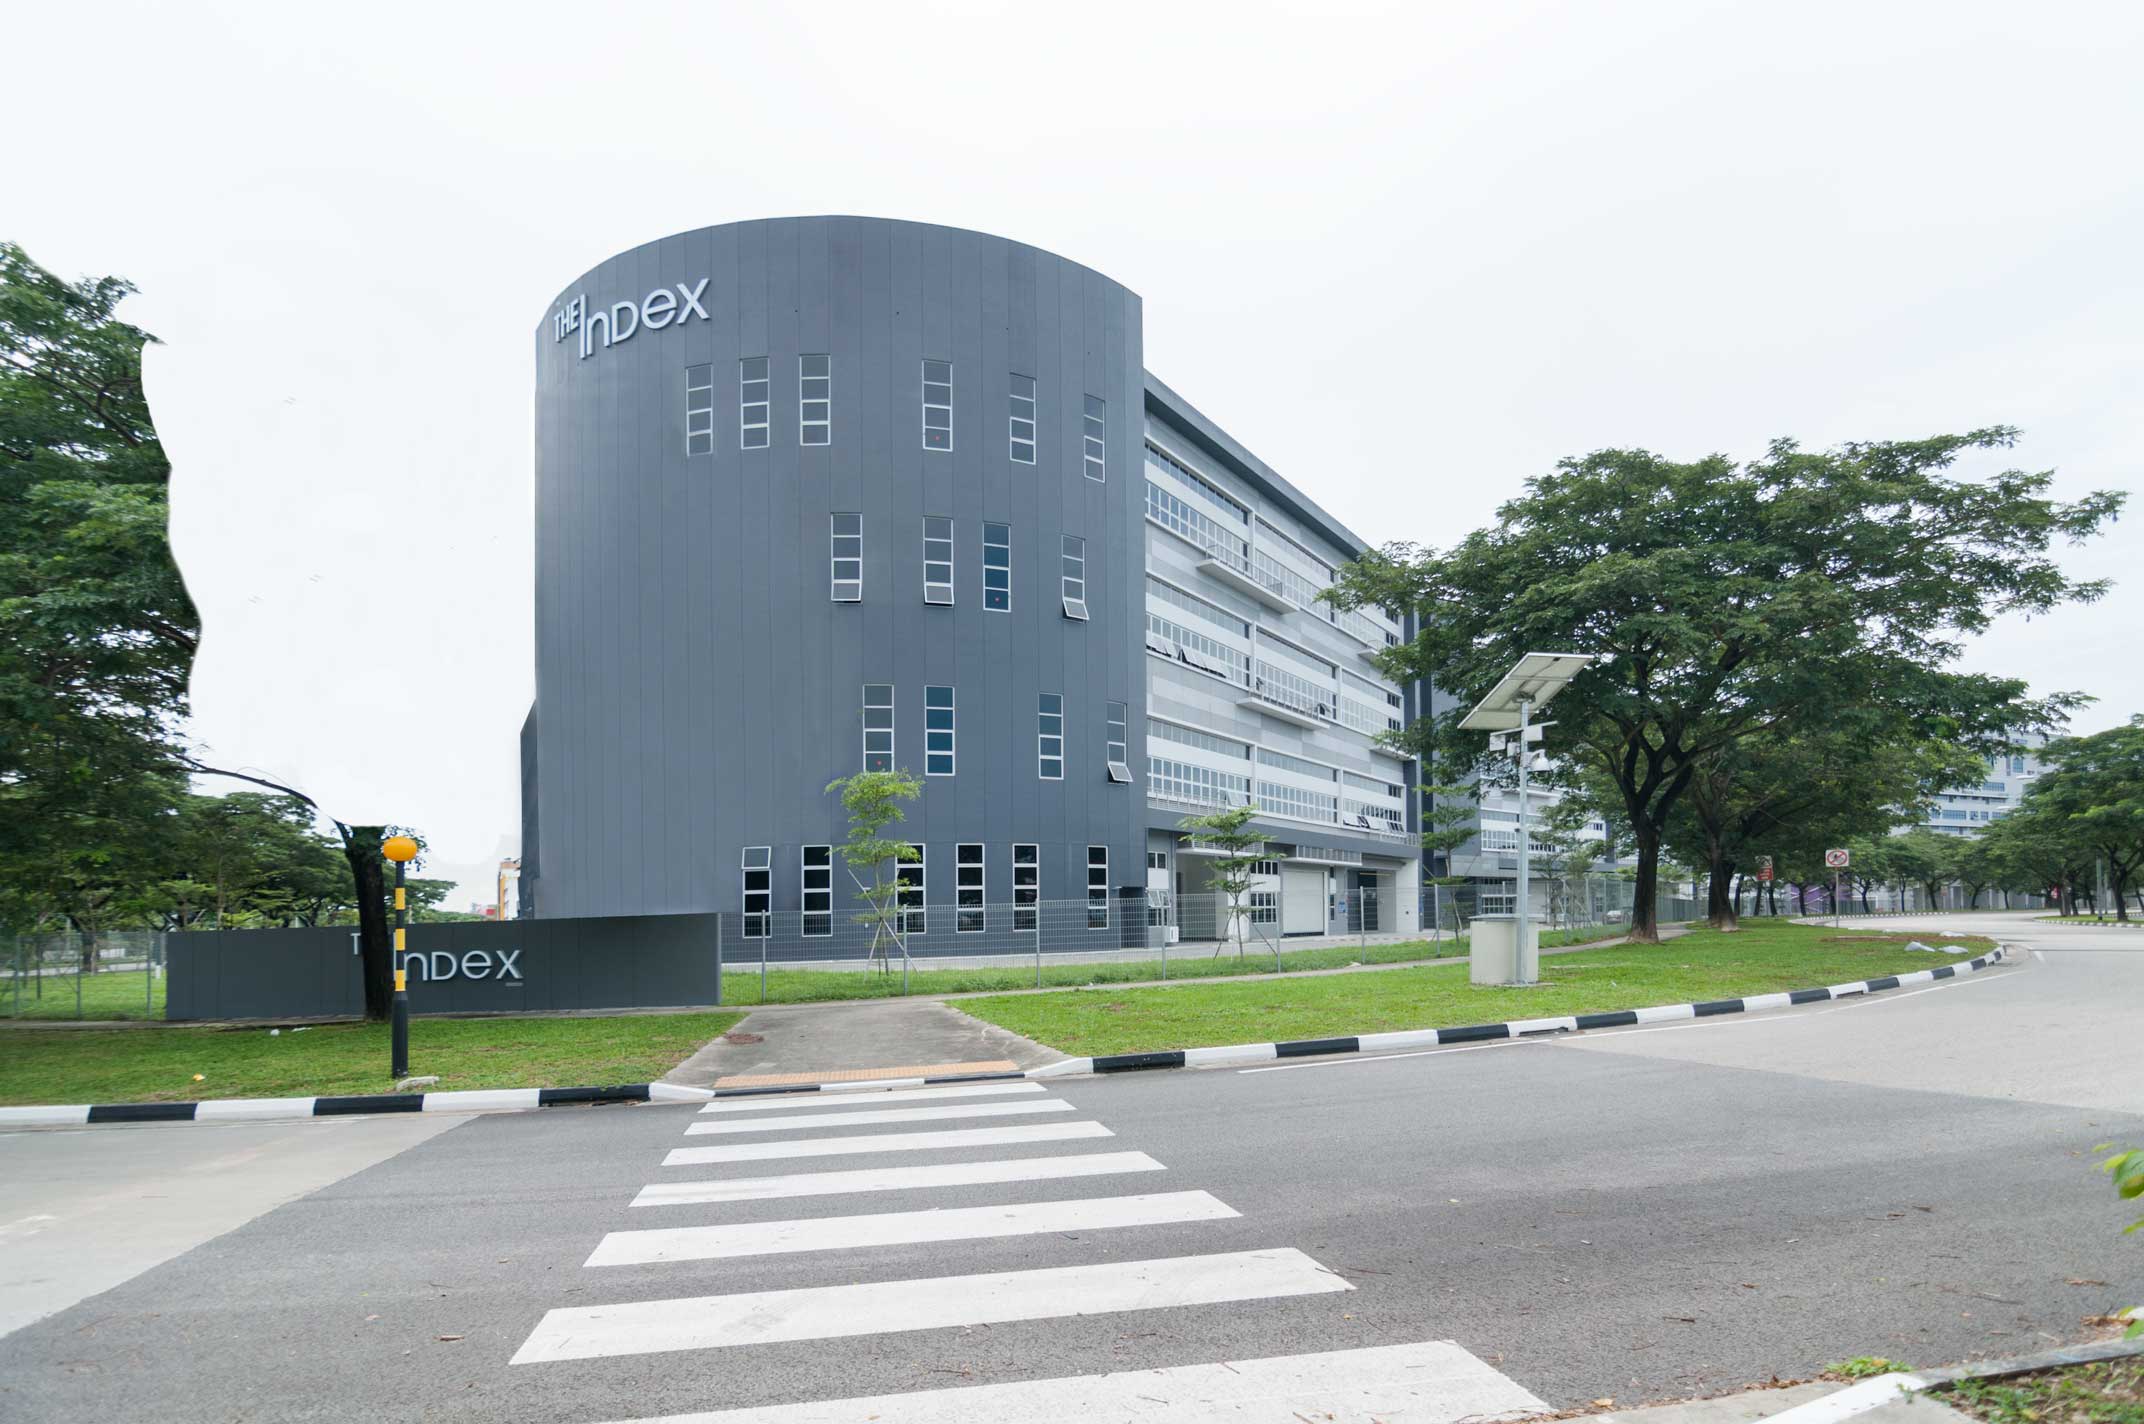
I worked at it until it looked something like this, before moving on.
Now you can see clearly that the chunk of tree blocking the building is gone. I decided to work on the lighting values at this point. So how did I even out this luminosity mess? In a situation like this, you will need to use a technique to separate the frequencies, so that the texture (high frequencies) will not be affected when you adjust the luminosity values. This technique is called “frequency separation”. Do a search and read up on it if you want to understand how it works. I am able to brush in the luminosity levels WHILE preserving texture, by only working on the low frequencies. You can see the image below that the luminosity has been greatly smoothen out and the overall image has improved.
You may ask, why not just use a luminosity layer and brush it in? Doing so will totally destroy the image. The texture here is largely based on variations in the luminosity levels. By doing so, you will be flattening out the texture, as well as all those embedded lines running vertically. To overcome this, you need to preserve the texture, by using frequency separation and working on only the low frequencies.
After blending in the right luminosity settings, I felt the building still needed a direction of light. We will work on that later on at the final step after doing the windows and sky replacement.
Blending it out with frequency separation. Notice the huge improvement.
Adding the missing windows
The hardest and most tedious part has already been done at this point. Next will be to add the missing windows in. I took additional reference photos during the shoot, to identify the location of all the windows. Referring to the image below, I sampled windows from the good ones on the right, and pasted them into position. To get them to fit, I used the transform tool to resize and skew (shortcut: CMD+click the corners) according to perspective. Using curves to each window individually to adjust their contrast will be very tedious. I decided to leave this step till the end where I would group the windows and apply the curves adjustment to all the windows, varying it with a gradient mask.

Adding in the windows
Recreating the logo on the ground sign
Next, I worked on the ground sign. I decided to superimpose the logo from another image I have taken. I begin by removing the lamp post and the tree trunk with the clone stamp tool to clean out and “prep my canvas”. I then cut out the logo portion of the other image which I needed and pasted it in. Use the transformation tool to resize and skew the logo to fit. (Here is a tip on how to easily align the logo: put the layer to 50% opacity, and it will work somewhat like a tracing paper.) Apply curves to the layer and use your eye to match the contrast until it looks seamless. You may also want to try the different layer blend modes alongside with the curves. I used a little bit of multiply blending.

Cleared the lamp post and tree trunk. Prepping to retouch the ground sign

Pasting a sample from another image

Blending the sign in with a contrast curve and multiply blending.
Sky replacement
Next step will be the sky replacement. I will not be going into detail on it. There are plenty of techniques and even plugins to help you with that. You can easily find great tutorials online. I have my own ways of doing it, and they are usually different for each photo I work on, depending on their complexity.
Sky replacement
Adjusting contrast
Lastly, the image looks a little too flat, I decided that the direction of the sunlight will be coming from the left. So using a mixture of curves, the overlay blend mode, and gradient masking on selective parts of the image, I could bring more depth with the lighting and shadows.

Final tweaks and touch-ups
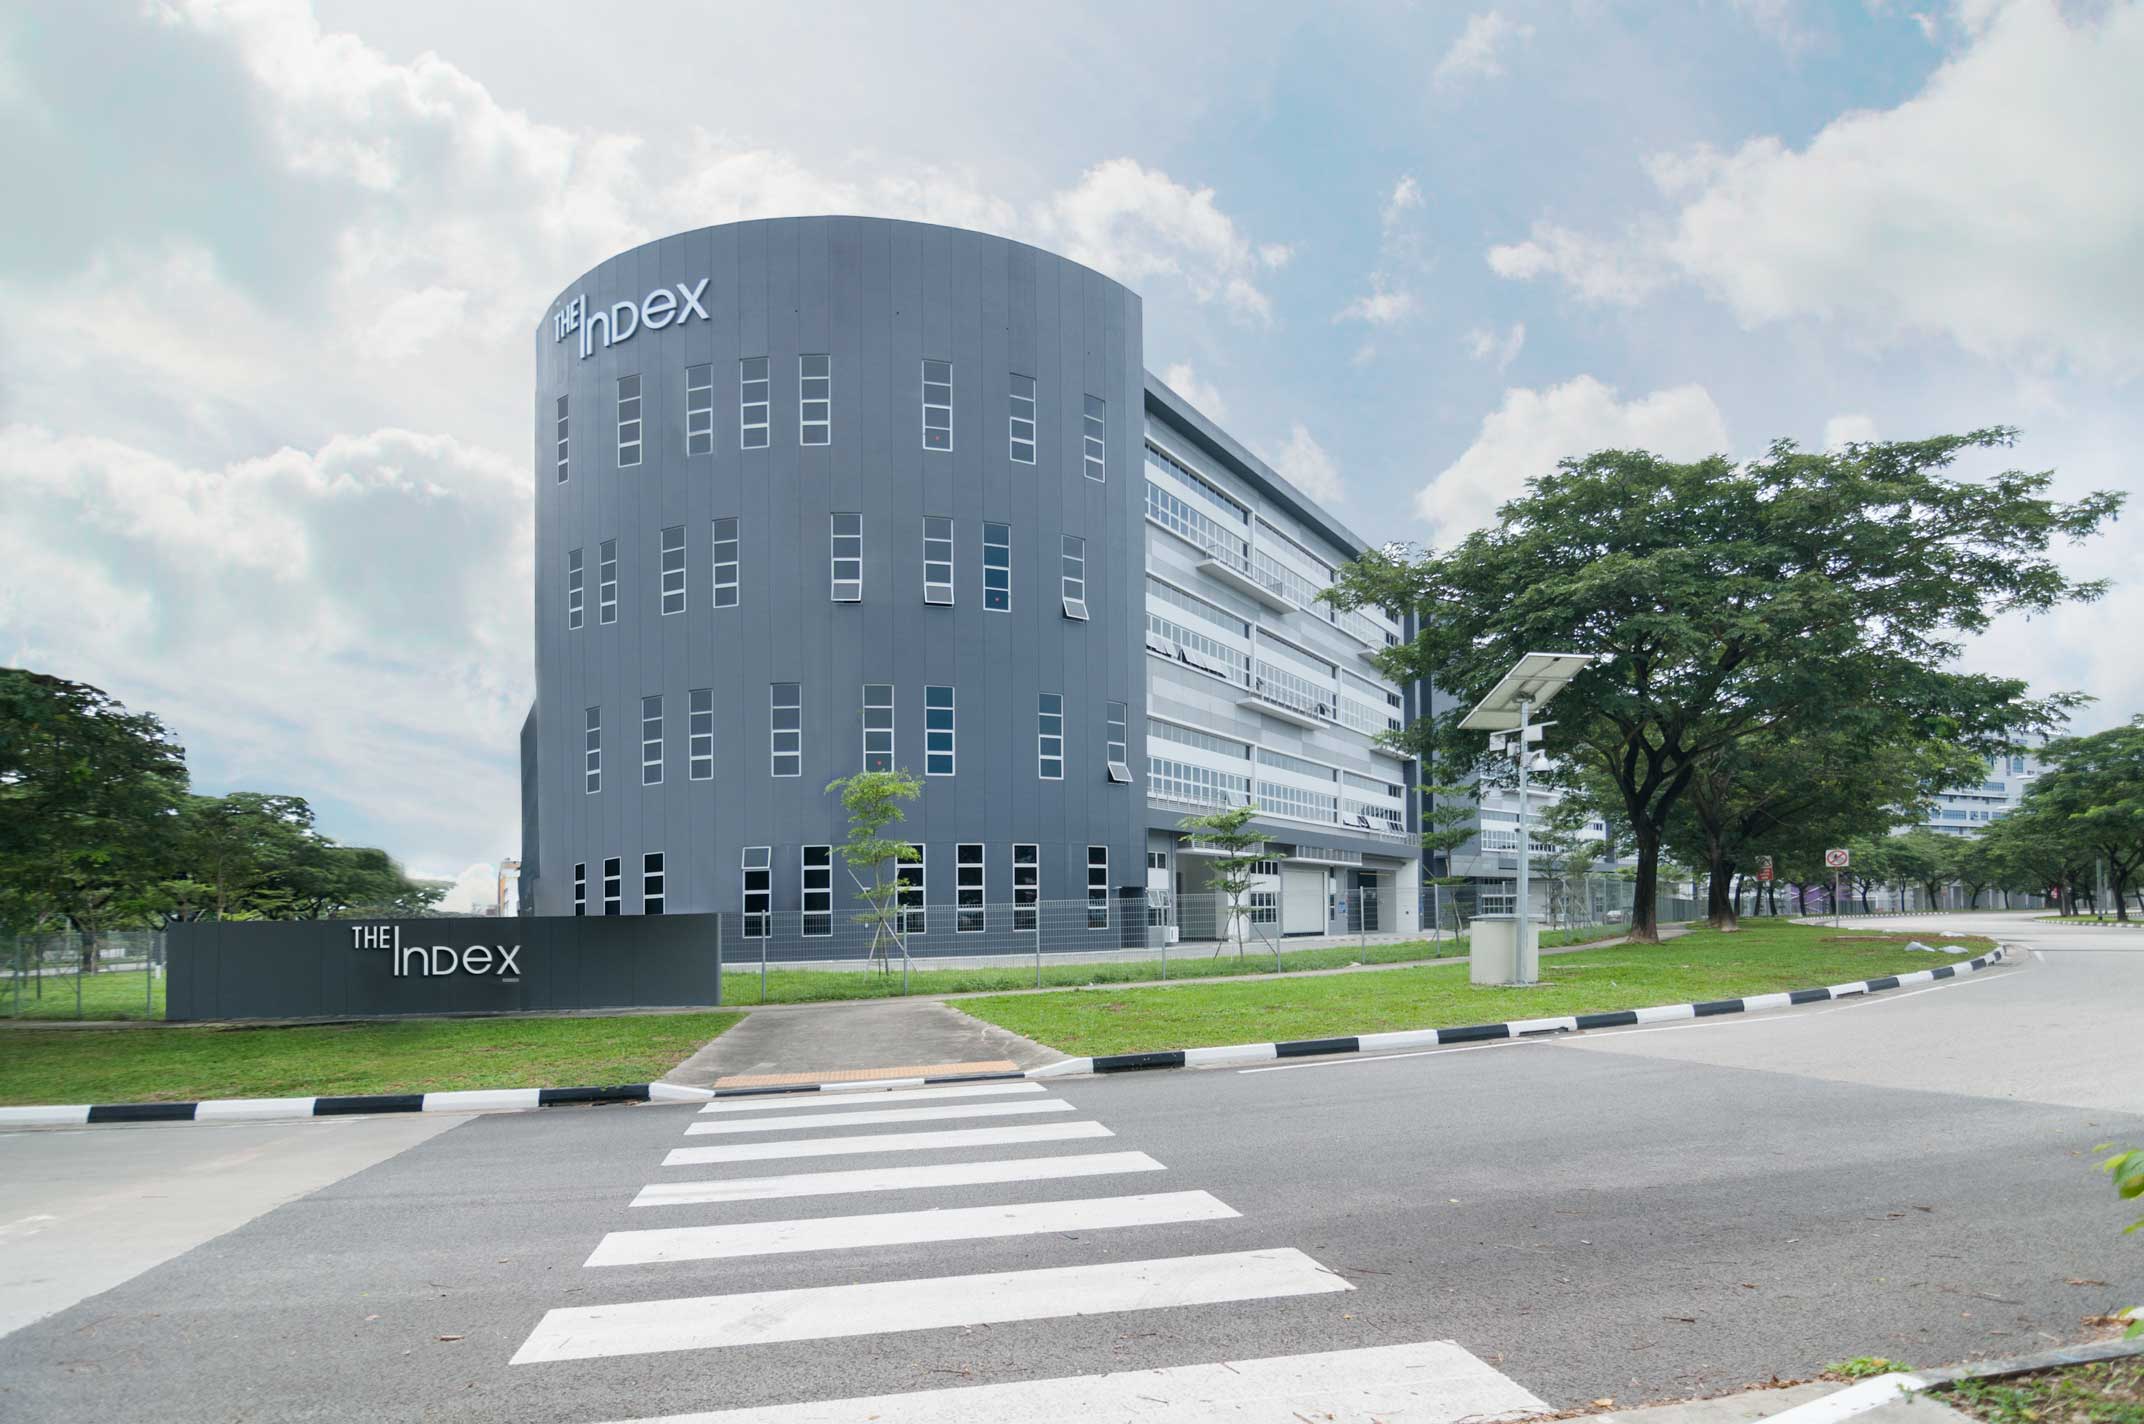
Done!
So here was how I did it. It was challenging, but as always, rewarding.
I may not have gone into great detail on some techniques here, if you need a little help figuring things out, or need a more in-depth explanation, feel free to ask me and I will try my best to help out.
Marcus
www.marcusinterior.com
Interior Photographer based in Singapore